


Cart
0

Quick Summary
Reinforced stitching is extra thread placed where a garment takes the most strain, such as shoulders, underarms, crotch and pocket corners, so seams hold when the fabric is pulled. Stronger options include double rows, felled seams and bar tacks, while basic lockstitching fails first under load.
- Clothes usually fail at the seams, not in the middle of the fabric.
- Double stitching puts two rows of thread on a seam, so one still holds if the other lets go.
- Bar tacks are dense zigzag blocks that suit pocket corners, belt loops and fly openings.
- Backstitch the ends of seams, since loose ends are where failures start.
- Stretch, bend and reach in a garment to check whether its seams gape or shift under load.
Table of Contents
- Why Your Hoodie Dies at the Seams (And How Reinforced Stitching Stops It)
- The Anatomy of a Seam: Where Clothes Actually Fail
- The Strongest Stitch for Clothing, Ranked by Someone Who Has Ripped Plenty
- How to Reinforce a Seam Without Owning a Commercial Sewing Machine
- Stitching in High-Stress Areas: Crotch, Underarms and Anywhere You Bend
- The Reinforced Straight Stitch: Cheap, Cheerful and Surprisingly Tough
- How to Tell If Your Gear Has Reinforced Seams Before You Pay for It
- Your Next Move: Wear the Gear, Then Test the Seams
- Frequently Asked Questions
Why Your Hoodie Dies at the Seams (And How Reinforced Stitching Stops It)
Last Updated: November 17, 2026
Let's be honest: nobody buys a hoodie planning to watch the seams give up on it. Yet that's exactly how most of them go. One day you're pulling a stubborn bolt out from under the Commodore, and the next you're staring at a gaping armpit like it personally betrayed you. Reinforced stitching is the difference between gear that lasts a season and gear that outlives your enthusiasm for the project. Reinforced stitching is simply extra thread placed where a garment takes the most punishment, so the seam holds when the fabric gets hauled on. Stick around and we'll show you how to spot it, and how to judge whether it's actually doing its job.
The Anatomy of a Seam: Where Clothes Actually Fail
Here's a fun fact nobody asks for: clothes rarely die in the middle of the fabric. They die at the joins. A seam is just two pieces of cloth held together by a line of stitches, and that line is the weakest link by design, because every stitch punches a tiny hole through the fabric that can tear under load.
Failure tends to happen in predictable places. Shoulder seams take the strain of reaching. Underarm seams get pulled every time you raise an arm to grab a wrench. Crotch and center seams cop the worst of it, because bending and squatting turns them into a tug-of-war. Knowing where the stress lives tells you where the thread needs to work hardest.
The Strongest Stitch for Clothing, Ranked by Someone Who Has Ripped Plenty
Not all stitches are created equal, and some are about as tough as a wet paper bag. Here's the rough pecking order we'd trust on a greasy workday:
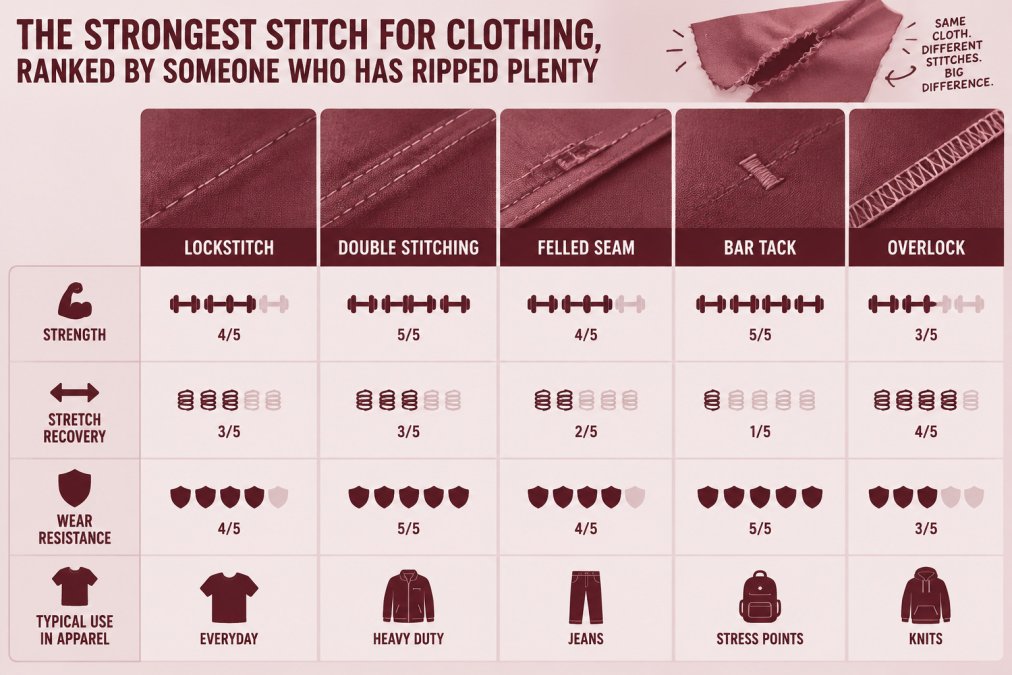
- Felled seam: The seam allowances are folded and stitched down, so there are no raw edges to fray. It's sturdy and tidy, though it takes more fabric and effort to produce.
- Double stitching: Two parallel rows of stitching instead of one. If one row lets go, the other is still holding the line.
- Bar tack: A dense little block of zigzag stitching at stress points like pocket corners. Short, but brutally effective where pull is concentrated.
- Lockstitch: The standard single-line seam. Fine for light use, but it's the first to let go when things get rough.
- Overlock: Great for stretch knits because it moves with the fabric, but its job is finishing edges and stopping fraying, not handling heavy strain on its own.
A common mistake is assuming more thread always means more strength. What matters is where the thread sits and how the stitch distributes load. A double row on a high-stress seam beats a dense single row floating in a quiet corner.
Here is how the main stitch types stack up for everyday strain, from toughest to most fragile.
| Stitch | Best for | Key difference |
|---|---|---|
| Felled seam | Heavy-use garments | Folded allowances, no raw edges |
| Double stitching | High-load seams | Two rows; one backs up the other |
| Bar tack | Pocket corners | Dense block at stress points |
| Lockstitch | Light use | Single line; first to fail |
| Overlock | Stretch knits | Moves with fabric; finishes edges |
How to Reinforce a Seam Without Owning a Commercial Sewing Machine
Don't have an industrial machine in the garage? Fair enough, most of us don't. You can still reinforce a seam at home with a basic sewing machine and a bit of patience, but the method you pick should depend on the fabric and the stress the seam sees. Here's a practical comparison of the options.
Backstitching is the cheapest reinforcement there is: sew a few stitches forward, then reverse over the same line for a quarter inch or so at each end. It locks the thread and stops the seam from unraveling. Strength gain is modest, flexibility is unaffected, and it's invisible from the outside. Best for lightweight wovens, casual hems, and anywhere you just want the seam to stop creeping.
Double stitching means a second parallel row about a quarter inch inside the original line. It distributes load across two lines of thread, so if one row fails the other keeps holding. It adds a little stiffness and visible topstitching, and it's the workhorse upgrade for denim, workwear, and any seam that gets hauled on. On knits, use a stretch stitch or a narrow zigzag for the second row so the seam still moves with the fabric.
Bar tacks are dense zigzag blocks sewn over a short rectangle at concentrated stress points like pocket corners, belt loops, and fly openings. They're brutally effective where pull is focused, but they're stiff and can pucker lightweight fabric. Reserve them for denim, canvas, and heavy knits.
Felled seams fold the seam allowances and stitch them down so no raw edges show. They're the strongest and tidiest option, but they take more fabric and effort and are hard to add after the garment is finished. Best left to the factory or a patient home sewer working on a flat piece before assembly.
Seam tape is a bonded or stitched strip that covers and stabilizes a seam, common in activewear and outerwear. It adds water resistance and reduces chafing, but it can stiffen the seam and doesn't suit every fabric. It's a specialist tool, not a universal fix.
A common mistake is assuming more thread always means more strength. What matters is where the thread sits and how the stitch distributes load. A double row on a high-stress seam beats a dense single row floating in a quiet corner. Watch out: over-tensioning the thread or using a needle too heavy for the fabric punches oversized holes and can weaken the seam you're trying to save, so match needle and thread to the material and test on a scrap first.
Stitching in High-Stress Areas: Crotch, Underarms and Anywhere You Bend
These are the places where reinforced stitching earns its keep, and the reason is mechanical: every time you bend, reach, or squat, the fabric on one side of the seam stretches while the other side compresses, and the stitches take the difference. The crotch seam on a pair of work pants can see that cycle hundreds of times a day. Underarms face constant lifting. Elbows, pockets, and the back yoke all see steady pull. Knowing the mechanism tells you what kind of reinforcement actually helps.
On denim and heavy workwear, look for double-stitched or felled seams at the crotch, back yoke, and pocket corners, plus bar tacks where pull concentrates. These fabrics are stiff enough that a second row of thread adds real strength without ruining the drape. On knits and activewear, the priority flips: the seam has to stretch with the fabric, so look for a stretch stitch, a narrow zigzag, or a flatlock-style construction rather than a rigid double row that will pop the first time you lunge for a wrench. On lightweight wovens, reinforcement should be minimal and matched to the fabric weight, because a heavy bar tack on thin cloth just creates a new tear point.
When you're inspecting a garment, check these zones first. Run a finger along the seam and feel for double rows or dense bar tacks. Flat, single-line stitching in these spots is a warning sign. Then do a gentle stress test: stretch, bend, and reach the way you would at work, and watch for any movement at the stitching. A seam that gapes or shows daylight under load is telling you it won't survive a season. Watch out: a seam that feels stiff and bulky in a high-flex area may actually be weaker over time, because rigid thread in a moving seam concentrates stress at the stitch holes and can lead to thread breakage or fabric tear.
The Reinforced Straight Stitch: Cheap, Cheerful and Surprisingly Tough
Here's the good news: the reinforced straight stitch is basically a standard straight line with a second pass and some backstitching, and it's one of the most cost-effective upgrades you'll find. It doesn't need fancy equipment, and it adds meaningful strength to ordinary seams. It won't beat a felled seam on a heavy-duty jacket, but for everyday wear on lighter pieces it's a solid, honest choice.
How to Tell If Your Gear Has Reinforced Seams Before You Pay for It
Before you buy, do a quick seam inspection. Turn the item inside out and look at the stress points. Count the rows of stitching: two or more on high-load seams is a good sign. Check for backstitching at the ends, since loose ends are where failures start. Tug gently on the seam and watch for gaps opening up. Look at the thread too. Tight, even stitching with consistent tension is what you want, and puckering or skipped stitches are red flags.
If the brand doesn't show you the inside of the garment, that's worth noticing too. Clothing shopping online is always a bit of a gamble, so ask questions about construction before you hit checkout.
Your Next Move: Wear the Gear, Then Test the Seams
Now that you know what to look for, put your new knowledge to work. Pick a garment you already own and inspect the seams in the high-stress spots. Then do a gentle stress test: stretch, bend and reach the way you would at work, and watch for any movement at the stitching. Gear that passes the test is earning its keep in the shed.
That's the whole game with reinforced stitching: it's not about flashy claims, it's about thread doing its job when it counts. When you're ready to see what well-built workwear looks like, browse our hoodies and tees and judge the seams for yourself.
Frequently Asked Questions
What is reinforced stitching?
Reinforced stitching is extra stitching added to a seam, usually by running a second row of thread along the same line or by switching to a tougher stitch type in high-load areas. The goal is simple: when the fabric is pulled, the thread takes the strain instead of the seam popping open. It is common on work trousers, jeans and workwear hoodies, and it is one of the cheapest durability upgrades a garment can get. Look for doubled rows of stitching or a visibly heavier thread line at stress points.
Which stitch is strongest for clothing?
For most garments, a double-stitched seam or a felled seam is the strongest option for everyday wear. A plain straight stitch is easy to make and stretches reasonably well, but it can unravel once a single thread breaks. Double stitching gives you a backup row, and a felled seam folds the raw edges inside so they are protected from abrasion. Bar tacks, the dense zigzag blocks at pocket corners, are strong at specific points but are not a seam type you run along a whole garment.
How can you tell if a garment has reinforced seams?
Turn the garment inside out and check the seams, especially under the arms, along the inseam and at the crotch. Two parallel rows of stitching or a thicker, denser stitch line usually signal reinforcement. Pull gently on the seam to see whether it shifts or puckers. Bar tacks at pocket and fly corners are another sign of a manufacturer who thought about stress. If the stitches look sparse or the thread looks thin, assume the seam is the weak point.
Where should work clothes have reinforced stitching?
Concentrate reinforcement where the fabric takes the most strain: the crotch and inseam, the underarm and sleeve seams, the back yoke, pocket openings and anywhere you kneel or reach. Workwear that gets soaked in grease also benefits from firm, tightly spaced stitching because it resists the seams being chewed by repeated washing. If you are a mechanic or garage hobbyist, prioritise the crotch and knee areas first, because that is where garments fail fastest.


